Important Update: Since this article was first published, Apple have released iOS 17.3 which contains a feature called Stolen Device Protection. Whilst the tips in this article are still good practice, it's important to learn about Stolen Device Protection from this article first to see how this can help you stay secure and whether you want to proceed with all of the tips below. If you are using an older device that cannot update to iOS 17.3 or higher, the below tips are still the best options to keep your device safe. If you have any queries on concerns, please reach out to us via our contact page.
Judging by common searches, if your iPhone is stolen you are likely to have a lot of anxious questions, such as:
|
Can my stolen iPhone |
Can my stolen iPhone |
How can I erase a |
Welcome to another Byte-size Briefing by The Final Step, where we advise on how to reduce your risks should your iPhone be stolen. This briefing covers a new mobile phone crime that affects private individuals and businesses.
We strongly recommend you read this briefing in its entirety and then look at your phone and decide which settings are appropriate for you. Changing one or two settings without reference to the others could result in some nasty surprises and that’s exactly what the briefing is trying to help you avoid. If you are a business, it’s best to consider this together with expert advice on your IT environment as a whole.
New criminal behaviour is prompting people and businesses to re-evaluate their mobile phone security, as the precautions we thought were sufficient are proving to be inadequate.
Fraudsters are stealing iPhones in a way that means they can clear out your bank account and steal your identity. These crimes highlight the need to add additional layers of security to your phone and to behave differently in public.
The crime is sometimes referred to as “shoulder surfing”, because thieves look over your shoulder and observe or record you entering your passcode into the phone. They then pickpocket or steal the phone AND already have your passcode.
You may have previously thought of the theft of your phone as a “petty crime”, but it has potentially catastrophic repercussions if thieves steal your device and know your passcode, as it means they can:
Raid your bank accounts.
Stop your ability to track and control all your Apple devices.
Make changes to your Apple ID and your personal information.
Restrict your access to personal photos and videos with no way to reclaim them.
Detective Superintendent John Roch, Head of Economic Crime Unit for London’s Met Police told the BBC that the scale may be small, but the impact can be huge.
The BBC reported that phone thefts are surprisingly common. In London in 2022, an average of 248 phones were stolen per day – that’s one phone every six minutes. Of the 91,000 reported stolen, only 2% were recovered. It can be extremely difficult, near impossible, to recover your device.
But the loss of the phone itself is relatively insignificant compared to the loss of your money, your identity, your credit rating, your precious memories in photos and videos and the threat to your business. The impact can be devastating.
The BBC reported that it took Jacopo de Simone 10 months to recover the £22,000 stolen from him overnight after the theft of his phone. Similarly, the Wall Street Journal (WSJ) reported that Greg Frasca spent months trying to regain access to his Apple ID and even offered to fly to Apple’s HQ to prove his identity and recover eight years of photos and videos of his children.
In this Byte-size Briefing, we will be focusing on iPhone security because, according to the WSJ (reporting on American incidents of this crime), Apple devices are seen as a lucrative criminal target because of the security loopholes that provide a greater payday. And, once the thief has exhausted exploiting your data on the phone, the device itself commands a higher value than alternative devices.
That being said, it would be a mistake to think the lessons here are only for iPhone owners, or that this is only a personal and not a business problem.
So, in addition to covering specifics for protecting your Apple devices with straight-forward how-to videos, there are general principles and best practices that apply to all mobile devices - be that a Google Pixel, Samsung Galaxy or any other smartphone or tablet! And if you are a business that allows mobile connectivity to your work environment – be that from a personal or a work device – we will outline the key principles for secure mobile device management (MDM).
Unfortunately, there is no “one tip” that guarantees protection from this crime, but by following the actions and behaviours we suggest, you will improve security around your device. So, if the worst should happen you will be in an informed position, enabling you to recover as best as you can.
A word of cautionWe strongly recommend you read this briefing in its entirety and assess your own situation before putting in place any of the changes. Implementing a single tip without considering the rest may have unexpected consequences. That said, it’s advisable to improve your security as soon as you can. |
It’s hard to advise on the best order in which to make the settings changes as it depends on your current settings and understanding. However, if you don’t have a backup, making sure you have one is an excellent first step!
The theft itself can be shocking, as it has been known to involve pickpocketing, mugging, distracting or even drink spiking. On top of that trauma, the recovery can also be tortuous. Financial organisations may be reluctant to pay out fraud claims if they believe you have “given away” your passcode. It can also be convoluted, time consuming and expensive to prove you are the true holder of the stolen identity. From a technical point of view, these are the risks you are looking to mitigate:
- Getting locked out of your phone.
- Having your money stolen via your financial apps.
- Being prevented from tracking your mobile phone using Find My iPhone.
- Getting locked out of any other devices associated with your Apple ID.
- Criminals gaining access to all your password info stored in Keychain and gaining access to a whole lot of other financial and personal information.
- Criminals having access to your Apple Wallet and its payment methods.
- Getting locked out of your Apple ID, which means:
- Criminals have longer to explore other financial hijacking options.
- Thieves can reset your recovery key to one unknown to you. If that were to happen, as Apple’s support page makes clear, “you could be locked out of your account permanently”.
- You lose your ability to wipe your device remotely.
One victim told the BBC he now avoids using financial apps on his phone at all, despite the inconvenience. At The Final Step we often say there is a balance to be struck between convenience and security, but adopting a security-first mindset is worth a little extra effort. Detective Superintendent John Roch encourages people to think of their phones as if they were a large bag of cash.
Certainly, it makes sense to preface technical advice with a caution to be more aware of your surroundings and try to avoid using your passcode whenever you can be overseen. It is safest to assume your phone and passcode will both be stolen, and you should set your iPhone up accordingly.
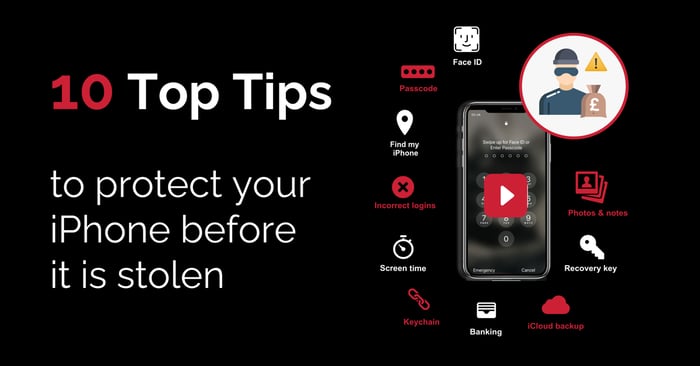
Let’s start with four tips that look at how to control access to the iPhone and all its data.
Ensuring that nobody can ever oversee you entering your passcode may be a difficult habit to form. Using Face ID is one layer of protection. It makes the use of a passcode less frequent, but it’s not infallible, as when it fails it will revert to asking for your passcode. Here’s an explanation of how to set it up.
One of my colleagues had his work iPhone snatched from his hand by a masked criminal on a bike, outside our central office at lunchtime in broad daylight. The thief was gone before he had time to react.
In this instance, the criminal is hoping to have unlocked access as they snatch it or guess the passcode or may be looking to reset it and sell the device. So, although you can’t consider a passcode on its own a sufficient defence, you should still set one.
We have three recommendations for defending your phone against someone who is trying to guess the passcode or hopes to, once they have snatched it. We’ll cover two of them with a video:
- Set a complex, harder-to-guess passcode, ideally an alphanumeric password.
- Set your iPhone to lock after 30 seconds of inactivity so the criminal has less time after a ‘snatch and run’ to gain access before it locks. Do this via Settings, Display & Brightness, Auto-Lock and select “30 seconds”.
- Set the phone so that too many incorrect attempts to enter a passcode will result in your phone wiping itself of data.
Here’s our blog on password hygiene, mentioned in the video tip.
Being able to track your iPhone’s location using the Find My iPhone function is a sensible precaution to put in place, mainly because it allows you to remotely wipe your data off the device. This is a major security benefit if the phone is no longer in your possession.
You may hesitate to use this option if you don’t have a backup of your phone’s data that you can restore to another device (we will cover this later). Knowing you have a backup gives you the confidence to act quickly, which is important as an organised, quick-acting thief will try to disable the feature before you can use it.
Wiping your own device requires that you know your Apple ID password. That password should be unique, strong and not easily guessable. That means you most likely will have it recorded on a password manager which you will need to access from another device. Most password managers work on multiple devices and allow you securely to share key passwords with others.
Having such a setup may allow you to act more quickly. Ideally, if you are a business, you would simply phone your IT department or IT managed services provider to remotely wipe it, assuming they have an MDM solution in place.
We mentioned earlier that some thieves snatch phones when you are distracted, hoping they can unlock them later by guessing the passcode. You can protect against unauthorised access by setting the phone to wipe after 10 failed passcode attempts. You must have access to your Apple ID and already have taken a backup to get your data back once you have bought a new device.
If your phone is stolen using intimidation and threats, it is unlikely you will feel safe withholding the passcode. If it is snatched from you whilst unlocked, the thief may already have access. In either scenario, simply having set a biometric or alphanumeric passcode is insufficient. Let’s look at better protecting the assets on your phone.
So far, we’ve looked at making unauthorised access to the iPhone itself harder. Now let’s consider better protection for your assets once a thief has access to the phone.
This isn’t an exhaustive list, instead it concentrates on key areas which if compromised can have very costly consequences.
Your Apple ID is the account that controls your Apple customer identity and proves your authority to make changes, including accessing your data and recovering your backup. It’s a key piece of your Apple security.
By default, the passcode to authorise an Apple ID password change is the same passcode you use to unlock the iPhone. So, if a thief knows your passcode, they can potentially control your Apple ID and lock you out of it by changing it to a password only they know. It is a core security principle that each password is unique and strong, so we are going to look at how you can add an extra authorisation needed to change your Apple ID password.
The more of our login details thieves can gather, the more opportunities they will have to steal from you. They are clever at seeing patterns in passwords, trying them elsewhere and selling stolen credentials via the Dark Web. If this leads to work logins the payday can be even bigger.
iPhones use Apple’s own built-in password management feature called Keychain. This remembers the login details for different types of accounts. By default, the authorisation to view and edit these login details is controlled via Face ID. When Face ID fails the holder of the phone is prompted for the phone passcode. In this instance, a criminal with your passcode now has access to all the logins you have stored in Keychain.
Resolving this probably means quite a lot of time and effort moving your Keychain passwords to a more secure password management solution. We use a solution that gives our staff a free personal licence. In an area where personal and business security overlap, it benefits everyone to encourage good cyber security standards in both our private and working life.
One of the first things a fraudster will do on your phone is attempt to siphon off as much money as possible using your financial apps
TIP 7: Protecting your financial apps |
There are too many options for us to produce a video tip on all financial apps, but these are the things you should consider.
Do you need to have financial apps on your phone, or could you live with them on another, less mobile, less “at risk” device? If you do need them on your mobile, can you limit their use in a way that reduces your exposure to acceptable losses?
Any financial app or login you keep on your phone should require a unique, strong password different to your phone’s passcode. Ideally, access will only be granted through a combination of biometric and other requirements. Audit your financial apps, look at which ones are essential to keep and consider how strong their individual security settings are and apply them.
In particular, ensure your Face ID does not default to passcode entry for standalone apps, most notably banking and password management apps.
The other important area of mobile security to consider is: if your phone is stolen, have you given yourself the best chance to recover your identity and data?
There is an argument to be made that using iTunes to back up your iPhone is more secure than iCloud. However, most people use iCloud as it is convenient and automated and therefore is much more likely to have an up-to-date version of your data. Most of us don’t have the discipline to perform a regular manual backup often enough to make it a practical option. So, we’ll focus on setting up an iCloud backup.
Let’s imagine there is no crime, and you just forget your Apple ID password. You used to have to go through a process called Account Recovery. Apple asks for proof of identity to be sent, and they verify the request is from the genuine owner and not some conman. The process takes a long time and there is no guarantee they will accept your proof. Not a very satisfactory process for anyone.
In 2020, Apple introduced the Apple ID Recovery Key, a unique random 28-character code which Apple accepts as proof of ID much more quickly and allows you to recover your Apple ID. But don’t lose it, because if you do and you have lost your Account ID password, you have lost your account – permanently. Make sure you keep it secure in a standalone password manager like Keeper.
The two do not run side by side. If you setup a Recovery Key you no longer have the option to go through Apple’s Account Recovery process. Whilst the Recovery Key has its advantages, there are also some downsides. Thieves want to give themselves as much uninterrupted time and as full access as possible to your phone. They can use the Recovery Key against you to achieve those aims.
If you haven’t set a Recovery Key, a smart thief will set one to lock you out. If you have set one, they will try to reset it to one only they know to lock you out. If you do set a Recovery Key, it is important you also set a unique, strong screen time password to provide an extra layer of authentication to make it harder for them to access and reset your Recovery Key. A criminal resetting your Recovery Key is very bad news indeed.
Often, we take photos of important documents, just in case we lose the originals or to save us carrying them around. It’s handy to have your passport details, driving licence, NI number or other information to hand on your phone.
TIP 10: Delete photos and notes with
|
We recommend you delete all photos or notes with such information. Criminals use such personal information to steal your identity and act as if they were you. A thief can even use the search function in your Photos app to find these documents in a matter of seconds. If you must have them on your phone, some password management apps allow you to store identities and photos on their apps.
Remember to use an application that has a separate, unique and strong way of authenticating you, so a criminal cannot gain access to your password manager.
All of the above is challenging enough for an individual. Unfortunately, it becomes even more complex when we consider the business use of mobile devices, where personal and business security overlap.
Let’s say you are a business that allows personal phones to access work systems and data. If that individual’s phone is stolen, you are relying more than you may be comfortable with on your employee’s personal awareness of and standards around mobile security.
On the other hand, if you are a business that provides staff with company iPhones, you may find staff associate that device with their personal Apple ID. When they leave you may struggle to transfer that iPhone to another employee, because as far as Apple is concerned it is a trusted device belonging to an individual. In effect, the company is locked out of its own device.
There is a balance to be struck between personal and corporate devices. Some people don’t want to carry yet another device and want to use their own for work. Others don’t want employers able to control or see anything personal and insist on a separate work device.
Whether you allow people to bring their own device (often referred to as BYOD), insist on issuing devices or a mix of the two, you need to agree on where the line is between personal and professional security with a written policy.
Because policies tend to slip from people’s memories and thieves are inventive, we strongly recommend you support your policy with MDM security software. This automatically enforces your policy on devices, separates work from private data and automates management. Can you imagine having to manually set up the above recommendations one iPhone at a time, and then repeat it all for Android devices?
If you don’t have MDM but want to beef up your mobile device security, email simon@thefinalstep.co.uk to organise a demonstration of how it works.
If I do all of this, am I covered?
Sadly, no security checklist is exhaustive. We have focused on one type of criminal activity that is, as far as reports indicate, currently focused on iPhones because they are a rich target. That doesn’t mean that Android devices are immune or that even a locked iPhone is 100% secure. There are other security issues, for example:
- From a locked screen you may still have access to the Apple Wallet (but you can disallow such access when locked).
- If you have access to a phone, that often gives you access to Multi Factor Authentication (MFA), which would undermine one of our security layers.
- If you have access to a phone, you often have access to email, which is a primary way to reset passwords.
Developing a security-first mindset is about adding layers of protection to reduce the risks, staying alert as new threats emerge and taking appropriate action. We will do our best to update this page as the crime and protections against it evolve.
Whilst we have focused on iPhones it is important to realise that a lot of the settings above are Apple feature settings. Many can be set on an iPad or a MacBook for example. You need to add similar security layers to those devices. If you had all three items in a bag that was stolen, the criminals would focus on the one with the weakest security.
All of this may seem incredibly daunting, particularly for a business. You may be asking yourself if this crime is even the biggest risk you are facing. Such thoughts are understandable but can lead to complacency. If you are overwhelmed, the best way to take control is to conduct an overall cyber security risk assessment.
This identifies your biggest risks and options to mitigate them. Nobody has the money or time to plug all the security holes they face. So, you need a method to ensure your financial investment in security has the biggest impact and reduces the highest risks.
Visit our cyber security solutions for businesses page to find out more about how risk assessments help with peace of mind and targeted spending.
We can deliver this briefing to you and your team in the form of an interactive online Byte-size Security Awareness Briefing. We will also explain how work and personal security intersect and re-enforce the importance of having robust BYOD policies and procedures in place. It's an opportunity to introduce or remind people about your own policies.
Contact simon@thefinalstep.co.uk if you are interested in such a briefing. Hopefully the resources listed above will help you if you want to create your own awareness training.